Advanced Google Earth - What is Keyhole Markup Language (KML)
According to google dev website “Keyhole Markup Language or KML is a file format used to display geographic data in an Earth browser such as Google Earth. You can create KML files to pinpoint locations, add image overlays, and expose rich data in new ways. KML is an international standard maintained by the Open Geospatial Consortium, Inc. (OGC).”
That’s nice but what is KML in practice? Essentially, it’s a tag-based markup language akin to XML. We can get into it in more detail here in a second but basically KML is a hierarchy of tags that describe points, paths, overlays, and polygons (henceforth referred to as polys). There can be a lot of information stuffed into a KML or relatively little information. KML files are very simple to code by hand initially but get more complex at scale.
KML or KMZ?
A KMZ file is just a KML file and “0 or more supporting files” zipped together in an archive. So essentially the KMZ format is useful for a KML that has supporting files that may go with it. In situations where you have an image file that overlays on a particular area on a map for example, that would best be packaged as a KMZ file.
Getting started
Now let me just say, the simplest KML is ALWAYS the one you export from Google Earth. There are good reasons to hand edit or use scripts to edit and build KML files and I’ll go over those later in this article. With those things in mind, let’s dive into a very basic example of a hand-coded KML file.
- Open a text editor on your computer and open a new text file.
- Copy the code below into the doc
<?xml version="1.0" encoding="UTF-8"?>
<kml xmlns="http://www.opengis.net/kml/2.2">
  <Placemark>
   <name>Simple placemark</name>
   <description>Attached to the ground. Intelligently places itself
       at the height of the underlying terrain.</description>
   <Point>
     <coordinates>-122.0822035425683,37.42228990140251,0</coordinates>
   </Point>
 </Placemark>
</kml>
- Save the file as ‘simple.kml’
- Open ‘simple.kml’ in google earth by double clicking the file or by opening google earth and loading the file.
The code above is a KML file that describes a point on a map. The structure of this file breaks down as follows
- An XML header. This is line 1 in every KML file. No spaces or other characters can appear before this line.
- A KML namespace declaration. This is line 2 in every KML 2.2 file.
- A Placemark object that contains the following elements:
- A name that is used as the label for the Placemark
- A description that appears in the “balloon” attached to the Placemark
- You can add HTML markup here to get headings and tables if you need them.
- A Point that specifies the position of the Placemark on the Earth’s surface (longitude, latitude, and optional altitude)
Adding Points
Let’s say we want a KML that represents a backhaul link. Take the above example and change the the existing placemark to:
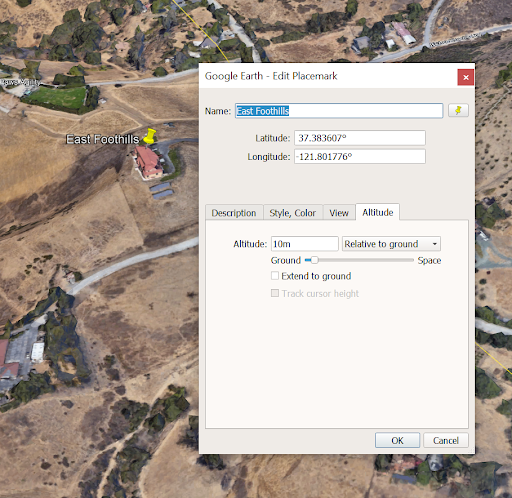
<Placemark>
            <name>East Foothills</name>
            <Point>
             	<altitudeMode>relativeToGround</altitudeMode>
 		<coordinates>-121.8017762492832,37.383607005057,10</coordinates>
            </Point>
</Placemark>
Then add in an additional placemark below the last one as follows:
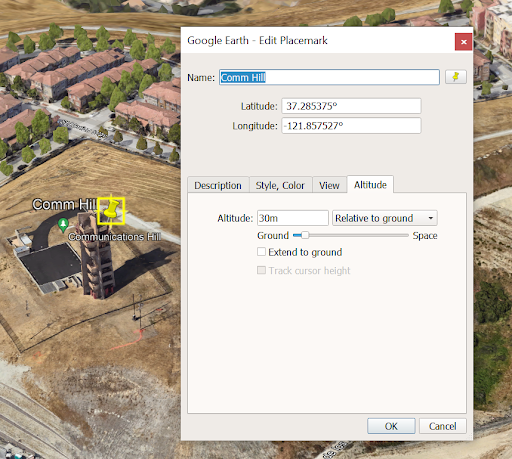
<Placemark>
            <name>Comm Hill</name>
             <Point>
                <altitudeMode>relativeToGround</altitudeMode>
                <coordinates>-121.85752683,37.2853750188,30</coordinates>
            </Point>
 </Placemark>
The <altitudeMode> tag is used to define how Google Earth (GE) is to interpret your height parameter. We are going to be using relativeToGround for our example.
When you are done the code should look like this:
<?xml version="1.0" encoding="UTF-8"?>
<kml xmlns="http://www.opengis.net/kml/2.2">
  <Placemark>
    <name>East Foothills</name>
    <Point>
      <altitudeMode>relativeToGround</altitudeMode>
      <coordinates>-121.8017762492832,37.383607005057,10</coordinates>
    </Point>
  </Placemark>
  <Placemark>
    <name>Comm Hill</name>
    <Point>
      <altitudeMode>relativeToGround</altitudeMode>
      <coordinates>-121.85752683,37.2853750188,30</coordinates>
    </Point>
  </Placemark>
</kml>
When you try to load this KML into Google Earth you’ll find an error. This is due to the fact you can only have one geometry nested directly into your KML tags. To solve this issue, let me introduce you to the <Folder> tag. The Folder tag exists so we can group together multiple geometries under a single KML tag. It works like this, wrap both placemarks in a <Folder></Folder> tag and then save and reopen the file in google earth.
Code should look like this:
<?xml version="1.0" encoding="UTF-8"?>
<kml xmlns="http://www.opengis.net/kml/2.2">
<Folder>
  <Placemark>
    <name>East Foothills</name>
    <Point>
      <altitudeMode>relativeToGround</altitudeMode>
      <coordinates>-121.8017762492832,37.383607005057,10</coordinates>
    </Point>
  </Placemark>
  <Placemark>
    <name>Comm Hill</name>
    <Point>
      <altitudeMode>relativeToGround</altitudeMode>
      <coordinates>-121.85752683,37.2853750188,30</coordinates>
    </Point>
  </Placemark>
</Folder>
</kml>
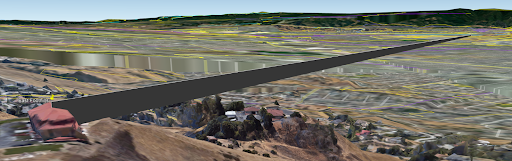
Adding Paths
Now let’s say we want to check preliminary LOS for our backhaul shot in Google Earth. We can do that by creating a line between our two points. Now this is where hand coded KMLs come in handy. It is difficult if not impossible to create a path in Google Earth with different altitudes for each endpoint. So using this method is a requirement if you want to accurately model a radio link. Go ahead and add in a new placemark containing the path into the previous example, below your point placemarks. The path placemark should look like this:
<Placemark>
      <name>Backhaul link</name>
      <description>Backhaul link</description>
      <LineString>
        <extrude>1</extrude>
        <tessellate>1</tessellate>
        <altitudeMode>relativeToGround</altitudeMode>
        <coordinates> -121.85752683,37.2853750188,30
              -121.8017762492832,37.383607005057,10
        </coordinates>
      </LineString>
  </Placemark>
Go ahead and copy the coordinates from the two points and paste them into the coordinates for the path (inside the <LineString> tag). These coordinates will act as x,y,z of the end points for the path. The order is Longitude, Latitude, and then Height in meters. The sequence is like so [longitude,latitude,height longitude,latitude,height] the digits are separated by commas and the points are separated by a space or newline char.
The <extrude> tag is used to tell GE that we want the line extended to the ground.
The <tessellate> tag is used to break up the line into small chunks so it’s easier to render.
Now save your KML and open in GE. You will see your line connecting two points. Now you can inspect your radio link path in a 3d environment.
Faster KML Generation
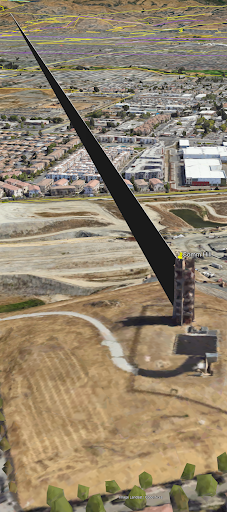
Depending on your workflow the fastest and usually best option for building a one off KML or KMZ file is to open Google Earth, add in your geometry, and save as a KML. That will give a solid base from which you only need to tweak a few things. Lets go over that now:
- Open Google Earth
- Add in the Comm Hill point. (hint: you can copy the long, lat, height numbers from the points out of the KML)
- Add in the East Foothills Point.
- Draw your radio link path.

Because you can only specify a single height for the path it’s difficult to line up the link path with both sites when each site has radios that are at different heights. As shown in the image above, when we set the height to 30m as required by the Comm Hill radio we are over double the height of our radio at the East Foothills point.
-
Create a new folder called “simple_points and add the two points and path to that folder.
-
Save that folder as a KML.
-
Right click on the saved file and open in the text editor of your choice. Once opened you should see a KML with a similar structure to the one we created but with a few more tags. Those tags are additional ways to customize your geometry. We won’t get into those but do check out Google’s page to find out more about them.
-
Find the tag and locate the coordinates for the line. They should be laid out in two, triples. The sequence is like so [longitude,latitude,height longitude,latitude,height] Each item in a triple is separated by a comma and each triple is separated by a space or a new line character.
-
Change the coords to reflect the coords of the associated points. In other words, just copy and paste the coords from each point to each end of the line. Your end code should look something like this:
<?xml version="1.0" encoding="UTF-8"?>
<kml xmlns="http://www.opengis.net/kml/2.2" xmlns:gx="http://www.google.com/kml/ext/2.2" xmlns:kml="http://www.opengis.net/kml/2.2" xmlns:atom="http://www.w3.org/2005/Atom">
<Document>
    <name>simple_points.kml</name>
    <Style id="default">
    </Style>
    <StyleMap id="default0">
        <Pair>
            <key>normal</key>
            <styleUrl>#default</styleUrl>
        </Pair>
        <Pair>
            <key>highlight</key>
            <styleUrl>#hl</styleUrl>
        </Pair>
    </StyleMap>
    <Style id="hl">
        <IconStyle>
            <scale>1.2</scale>
        </IconStyle>
    </Style>
    <Folder>
        <name>simple_points</name>
        <open>1</open>
        <Placemark>
            <name>East Foothills</name>
            <Point>
                <altitudeMode>relativeToGround</altitudeMode>
                <coordinates>-121.8017762492832,37.383607005057,9.999999999999998</coordinates>
            </Point>
        </Placemark>
        <Placemark>
            <name>Comm Hill</name>
            <Point>
                <altitudeMode>relativeToGround</altitudeMode>
                <coordinates>-121.85752683,37.2853750188,30</coordinates>
            </Point>
        </Placemark>
        <Placemark>
            <name>Backhaul link</name>
            <description>Backhaul link</description>
            <styleUrl>#default0</styleUrl>
            <LineString>
                <extrude>1</extrude>
                <tessellate>1</tessellate>
                <altitudeMode>relativeToGround</altitudeMode>
                <coordinates>
                    -121.8017762492832,37.383607005057,9.999999999999998 -121.85752683,37.2853750188,30
                </coordinates>
            </LineString>
        </Placemark>
    </Folder>
</Document>
</kml>
- Now save that and reopen it in Google Earth. Viola, your line now matches the height of both radios on the link!
This method will give you lots of boilerplate tags to work with when you generate KML files this way. That is usually why saving a KML from Google Earth is the fastest way to build these, then you can tweak it as you see fit. This stuff really comes in handy when creating KML files via scripts. We will get into how to do that with python and the simpleKML library in a different article.
Until then feel free to check out simpleKML here: https://simplekml.readthedocs.io/en/latest/ For more information on building and manipulating KMLs check out google’s documentation https://developers.google.com/kml